Scratchbuilding 1:72 Scale Weapons and Vehicle Accessories
1:72 Scale Modelling Techniques
Armoured vehicles, trucks and jeeps can be improved visually, or converted to represent a variant of an existing model kit simply by adding a few extra parts. Plastic model kits are typically sold without the immense stowage one would normally see attached to the outside of a vehicle on campaign. It can be a lot of fun to recreate the lived-in look of an armoured vehicle which quickly spreads to the surrounding terrain if the vehicle remains stationary for some time. Some research will be required. Some of the parts required may come from the spares box, others may be built from scratch.
Tools and Accessories
- Motor Tool
- Rai-Ro Adhesive Wax
- Rai-Ro Modelling Wax
- Small Drill Bit
- Plastic Sprue
- Plastic Card
- Soft Iron Pins
Panzerfaust Rocket Launchers
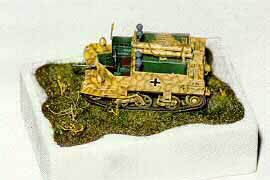
Jim Gordon scratchbuilt Panzerfaust rocket launchers to equip his Panzerjäger Bren conversion shown above:
- The stick part is simple: Just cut a length of rod and add a bit of plastic for the sight/trigger mechanism. The length of the Panzerfaust was 112 cm, divided by 72 = 15.5 mm for the overall model length. The launcher, or stick, will be about 12 mm in length, the warhead 3.5 mm in length.
- The Panzerfaust models 30, 60, and 100 all had bomb diameters of 15 cm. Divide this by 72 and the diameter of the part will be 2 mm. The hollow charge grenade itself needs to be shaped from a piece of plastic sprue inserted into a drill or motor tool, and filed down into the characteristic double cone shape.
- Carefully glue the bomb to the launcher with slow setting glue so that the alignment can be set from all angles.
- Overall paint can be dark yellow, grey, or olive.
- There was a prominent warning stencil on the launcher body which stated “Achtung Feuerstrahl” in large red letters. There was also a large white or yellow square painted on the warhead with firing instructions for the user.
Tow Rope
Military vehicles often carry tow ropes, either standard issue or procured in the course of the campaign. German Tiger tanks were prone to break down frequently, and they carried tow ropes attached to brackets on the hull sides for easy access in battle. Other combat vehicles are sometimes photographed with tow rope already attached to a tow hook at the hull front and a lifting hook or handle on the rear engine deck. Maybe this is a convenient way to carry the relatively inflexible steel cable when no dedicated mounting brackets are available, maybe the vehicle is unreliable and needs frequent towing. Whatever the reason, tow ropes add visual appeal to some vehicle models, and they are standard equipment on others. Armoured vehicle kits are not always equipped with tow rope, because it is a difficult part to model in scale. Some Tiger and Panther models have cast-on tow ropes, some don’t, and a few come with spare tow rope to be glued in place.
Cast-on tow rope is usually scaled correctly, but the effect is not entirely realistic. Separate tow ropes are often too thick to be accurate, some measure up to 75 mm in diameter, and they are even more inflexible than the original. One alternative is to scratchbuild tow rope of different strength, using thread of 0.3 to 0.5 mm thickness. The difficult part is the grommet: Tow cable is spliced to form an eye at each end. There is an easy way to create this effect, using Rai-Ro modelling wax. Set a pin or metal axle rod in a vice to hold it firmly in place. Loop the thread around the rod once, and twist the two ends of the thread together until the grommet around the rod has the desired size and shape. Apply liquid modelling wax to the area immediately behind the grommet, fusing the thread together permanently. Hold the thread for a few seconds, until the wax has hardened. Separate the strands behind the spliced area, and cut one loose end off. Slide the grommet off the axle rod, loop the other end of the tow rope around the axle and repeat the process.
Many vehicle models have tow hooks with D-rings already attached to them, in which case the tow cable may be modelled in place. Fix the vehicle in a vice, protecting the surface detail with a soft tissue. Drill the D-ring open if necessary. Loop the thread through the D-ring, twist to form a grommet, seal the grommet with modelling wax, cut off one strand. Loop the other end of the tow cable through a rail or lifting hook on the rear engine deck. Allow enough slack to drape the tow rope over the vehicle body realistically. Loop the loose end around the tow cable several times, put enough tension on the two strands to form the grommet, and seal it with wax. The second grommet is the more difficult one, because the two strands cannot be twisted together easily. Another difficulty is that the slack needs to be just right. If the tow cable is too taut or too loose, release the second grommet with the hot spatula and try again. Once the desired effect has been achieved, cut the loose strand. The tow cable may be painted with superglue to shape it, harden it, and tack it to certain points of the superstructure.
Schürzen
To counter the threat of shaped charges fired from Bazooka rocket launchers as well as captured German Panzerfausts used against their former owners, German tanks were equipped with sideskirts which prematurely detonate an approaching bazooka warhead. Many vehicles had Schürzen added in the field, but a good number of model kits are sold without the necessary parts to recreate this life-saving devices. One obvious solution is to take measurements from scale drawings, and cut out the additional armour plates accordingly.
Alternatively, anyone who owns a model kit with Schürzen can use the kit parts as convenient templates for cutting additional plates out of plastic card or metal screen. Fujimi offers 1:76 scale kits of the StuG III, Pz.Kpfw. IV, and Jagdpanther with Schürzen, which may be used as masters. Fujimi’s Pz.Kpfw. IV Ausf. J actually comes with simulated screen Schürzen which are easily replaced by more realistic looking pieces cut from metal or plastic screen material available at hobby shops. The necessary mounting brackets can be cut from plastic card.
Swords
Tony De Lyall has a useful modelling technique for swords and other bladed weapons in miniature:
- Soft iron pins, not steel pins, are used to replace the plastic weapon.
- Soft iron pins can be tapped with a hammer, or squeezed with pliers to flatten them carfully, and make them appear less round in shape.
- The pins may be curved by forming them against a round object. A small paint bottle or a similar object with 3-4 cm diameter provides enough curvature for a sabre.
- Remove the plastic sword, and squash the figure’s hand flat with pliers. This gives a large area through which the pin can be inserted without tearing the plastic.
- Insert the pin, and push it through almost to the pin head. Apply super glue to the pin head, and pull the pin through to the pin head. Allow the glue to set.
- Trim the plastic of the squashed hand, reshaping it and the glue blob into a new hand and sword hilt.
- Cut the pin to size. A 3-foot sword scales out to 10 mm pin length.
- Paint the figure. Once the hand is painted, paint on a sword hilt. The pin head forms the end of the sword, and the globular shape of the glue blob helps define the rest of the hilt.
If you have developed a useful scratchbuilding or modelling technique you would like to share with other readers, please write to editors@miniatures.de.